You can Check Your Blog Robots.Txt File by this link:
http://www.yourdomain.com/robots.txt
Enabling Robots.txt File:
So, This process is so easy just follow the simple steps below.
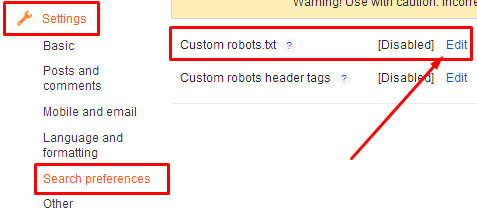
- Go To Blogger >> Settings >> Search Preferences
- Look For Custom Robots.Txt Section In The Bottom and Edit It.

- Now a check box will appear tick "Yes" and a box will appear where you have to write the robots.txt file. Enter this:
User-agent: Mediapartners-GoogleNote : The first line "User-agent: Mediapartners-Google" is for Google AdSense. So if you are using Google AdSense in your blog then remain it same otherwise remove it.
User-agent: *
Disallow: /search?q=*
Disallow: /*?updated-max=*
Allow: /
Sitemap: http://www.yourdomain.com/feeds/posts/default?orderby=updated
- Click "Save Changes".
- And You are Done! Now Lets take a view on the explanation of each of the line:
- User-agent: Mediapartners-Google : This is a first command which is used for Google AdSense enabled blogs if you are not using Google AdSense then remove it. In this command, we're telling to crawl all pages where Adsense Ads are placed!
- User-agent: * : Here the User-agent is calling the robot and * is for all the search engine's robots like Google, Bing etc.
- Disallow: /search?q=* : This line tells the search engine's crawler not to crawl the search pages.
- Disallow: /*?updated-max=* : This one disallows the search engine's crawler to do not index or crawl label or navigation pages.
- Allow: / : This one allows to index the homepage or your blog.
- Sitemap : So this last command tells the search engine's crawler to index the every new or updated post.
You can also add your own command to
disallow or allow more pages. For Ex: if you want to disallow or allow a
page then you can use this commands:
To Allow a Page:
Allow: /p/contact.html
To Disallow:
Disallow: /p/contact.html

0 comments:
Post a Comment